
The C-41 film process explained: a complete guide
Contents
- What is the C-41 process?
- How C-41 works: the chemical reaction
- C-41 temperature and precision
- C-41 development time and chemical baths
- C-41 versus E-6: which process for which film?
- Developing C-41 at home: practical steps
- After developing: scanning, printing and storage
- Frequently asked questions
Last updated: 5 October 2026
What is the C-41 process?
The C-41 process is the standard method for developing modern colour negative film. C-41 is Kodak's process designation. Since its introduction in the 1970s, it has become widely used for colour negative film in formats including 35mm and 120.
Why does C-41 matter? Many familiar films share the same processing system. Whether you shoot Kodak Gold, Fujifilm Superia or CineStill 400D, the film uses C-41 colour development.

At Analog Film Lab, professional Noritsu scanners help us capture colour and detail from developed C-41 negatives.
C-41 became established in the 1970s, replacing earlier colour negative processing systems and helping standardise laboratory workflows.
How C-41 works: the chemical reaction
C-41 uses chromogenic development: the image dyes form during processing through reactions involving the colour developer and dye couplers already present in the film.
Colour negative film and chromogenic development
Colour negative film contains light-sensitive layers that respond to red, green and blue light, along with dye couplers. Real film constructions can contain several layers for each colour record.
During development, exposed silver halide is converted into metallic silver. Oxidised colour developer reacts with the couplers to form image dyes. This creates a colour negative, with tonal and colour relationships that must be inverted during scanning or printing.
This differs from conventional black-and-white film, where the final image is formed primarily by silver rather than colour dyes. C-41 is designed for chromogenic development.
The stages of film processing
A simplified C-41 workflow can be described in five stages. The exact baths and sequence depend on the chemistry:
- Development, colour developer forms the silver image and, through the dye couplers, the dye image.
- Bleaching and fixing, these steps remove silver while leaving the dye image. Some kits combine them in a bleach-fix bath; other systems use separate bleach and fixer.
- Washing, water removes processing residues according to the manufacturer's sequence.
- Final rinse or stabiliser, the specified final bath supports appropriate image preservation and drying. Its composition and use depend on the system.
- Drying, dry the film in a clean, low-dust environment.
Every stage matters. Skipping or incorrectly performing a step can lead to colour shifts, poor contrast, residues or permanent damage.
C-41 temperature and precision
Temperature control is crucial in C-41 development. The conventional developer stage operates at approximately 38°C, but the exact target and tolerance must come from the chemistry manufacturer's instructions. Professional process tolerances can be tighter than those stated for some home kits.
A lower temperature slows development and can affect negative density, contrast and colour balance. A higher temperature can also change the result. Do not assume that a small error is harmless.
Professional labs use controlled equipment to maintain processing temperature. At home, a suitable water bath and accurate thermometer help keep the developer at the required temperature.
Temperature and development time are linked, but do not improvise an adjustment. Follow a time-and-temperature schedule supplied for your exact chemistry and processing method.
C-41 development time and chemical baths
A conventional C-41 colour-developer reference is 3 minutes 15 seconds at approximately 38°C. Use the instructions for your particular chemistry, equipment and reuse condition rather than treating this as a universal recipe.
What each chemical bath does
Developer, reduces exposed silver halide to metallic silver. Its oxidation products react with dye couplers to form the colour image. This is the image-forming stage.
Bleach and fixer, bleach converts developed metallic silver into a form that the fixer can remove. Fixer also removes remaining silver halide, leaving the dye image. Some home kits combine these functions in bleach-fix; professional systems often keep them separate.
Wash water, removes processing residues at the stages specified by the manufacturer, helping prevent stains and deterioration.
Final rinse or stabiliser, provides the final treatment specified for the film and chemistry. Depending on the product, it may contain wetting agents and preservatives. Follow its instructions, including whether any further washing is allowed.
Processing times and adjustments
Typical stages and timing guidance are:
- Colour development: conventionally 3 minutes 15 seconds at approximately 38°C; follow your system's instructions.
- Bleach and fixer, or bleach-fix: use the manufacturer's sequence and minimum times.
- Washing: use the specified water temperature, flow or water changes and duration.
- Final rinse or stabiliser: follow the product's dilution and treatment time.
- Drying: allow the film to become completely dry; time depends on airflow, temperature and humidity.
There is no universal percentage adjustment for each degree of temperature difference. Use a tested schedule from your chemistry manufacturer. Bath times, temperatures and reuse adjustments differ between kits and laboratory systems.
Push processing uses adjusted development, usually a longer developer time, often after exposure at a higher chosen ISO setting. It can increase contrast but cannot recover shadow detail that was never recorded. Pull processing usually shortens development after additional exposure to control contrast. Agree the treatment with your lab before processing.
C-41 versus E-6: which process for which film?
C-41 and E-6 serve different films. C-41 normally produces a colour negative for scanning or printing. E-6 processes slide film into a positive transparency that can be viewed directly.
C-41 gives a negative image that is inverted when scanned or printed. This provides scope for adjusting colour balance in the finished image.
E-6 uses a different chemical sequence, including reversal-related stages, and must follow its own processing instructions. It is not interchangeable with C-41.
For beginners, colour negative film is a practical starting point because it is widely available and offers flexibility in scanning and printing. Home processing still requires careful control of time and temperature.
Developing C-41 at home: practical steps
Developing C-41 at home is possible with careful preparation and consistent temperature control.
What you need for home developing
The basic equipment includes:
Kodak Gold 200 35mm – 36 exposures →
- A C-41 chemistry kit, mixed exactly as instructed
- A light-tight developing tank and suitable reel
- An accurate thermometer
- Dedicated measuring jugs and a stirring tool
- A completely dark loading area or light-tight changing bag
- A suitable temperature-controlled water bath
- A timer
- Film clips and a clean drying area
Chemistry prices and capacity vary by product. Calculate the cost per roll from the kit price and its stated usable capacity, allowing for shelf life and your shooting volume. Include equipment and scanning costs when comparing home processing with a lab.
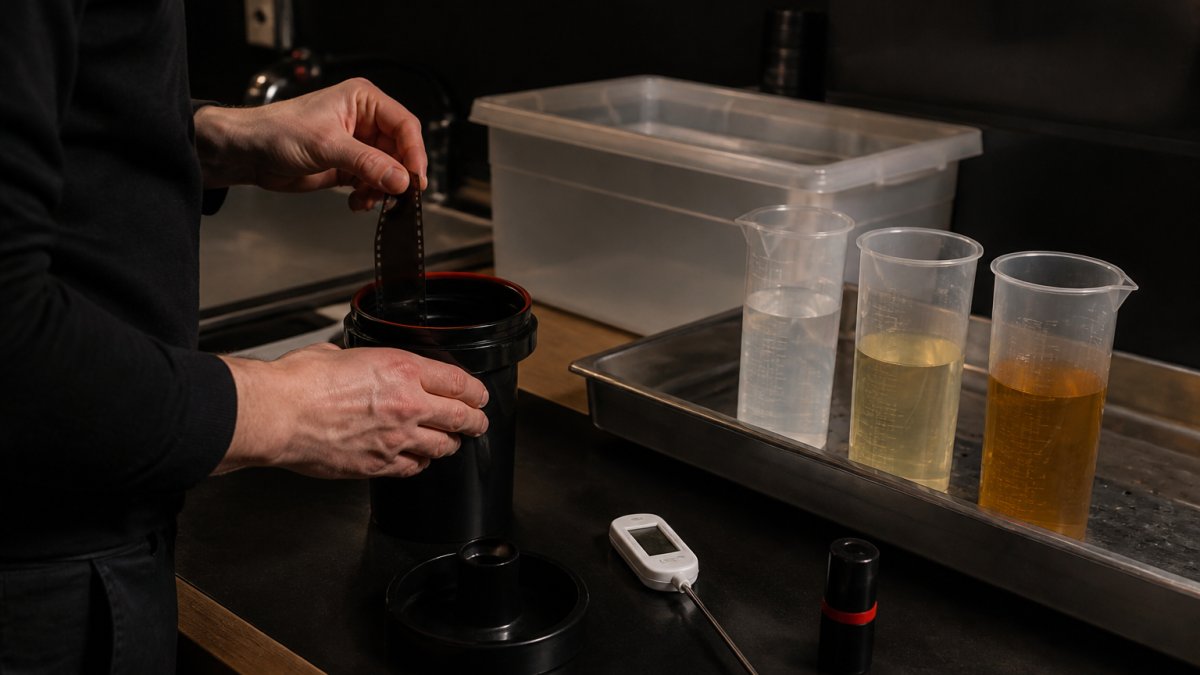
The practical sequence is:
- Prepare your chemistry, mix the concentrates or powders exactly as instructed and bring each bath to its specified working temperature.
- Load the film in complete darkness, load the film onto the reel and close the light-tight tank. Once properly closed, the tank can be used in room light.
- Start development, add the developer at the specified temperature. Follow your chemistry and tank instructions for timing, agitation and draining; conventional C-41 development is often 3 minutes 15 seconds near 38°C.
- Continue with bleaching and fixing, use separate baths or a combined bleach-fix as specified by your kit. Follow the required times and agitation rather than copying another system's schedule.
- Wash thoroughly, use the washing sequence, temperature and water changes specified for the chemistry. Clear-looking water alone does not prove that washing is complete.
- Apply the final bath and dry, use the prescribed final rinse or stabiliser, then hang the film in a clean, low-dust area. Allow it to dry completely before handling or sleeving.
Safety, storage and disposal of used chemistry
Treat C-41 chemistry as chemical products with product-specific hazards. Read the labels and safety data sheets before mixing or use; do not assume that all products or vapours are harmless.
Use the gloves, eye protection and ventilation specified by the manufacturer. Avoid skin and eye contact, keep food and drink away from the work area and use dedicated equipment.
Keep chemistry in clearly labelled, suitable containers, away from children and pets. Shelf life differs between concentrates and working solutions and depends on storage, opening and use. Follow the product's instructions.
For disposal, do not simply pour used C-41 chemistry down the drain. Ask your local waste service about the appropriate collection route for photographic chemistry, including silver-bearing fixer.
After developing: scanning, printing and storage
Once the film has been processed and dried, the negative becomes the starting point for scanning or printing.
Scanning is now a common way to turn negatives into digital photographs.
You can also scan at home with a flatbed, dedicated film scanner or camera setup. Results depend on the equipment, film format and technique.
Preserving the original negatives remains important. They allow future rescanning and printing even if your digital files are lost.
C-41 connects the exposure in your camera with the final photograph through a controlled chemical process.
Analog Film Lab offers professional C-41 processing, scanning and advice, drawing on Foto Americaine's photographic heritage since 1906. Our film range includes Kodak Gold, Kodak UltraMax and CineStill 400D, alongside developing and scanning services.

Stage |
Time |
Temperature |
|---|---|---|
Development |
Conventionally 3:15; check chemistry instructions |
Approximately 38°C; use specified target and tolerance |
Bleach and fixer, or bleach-fix |
As specified for the chemistry |
As specified for the chemistry |
Washing |
As specified for the chemistry |
As specified for the chemistry |
Final rinse or stabiliser |
As specified for the product |
As specified for the product |
Drying |
Until completely dry |
Suitable controlled drying conditions |
Consult the chemistry manufacturer's processing instructions and relevant photographic process standards for the requirements of your particular system. The table above is an overview, not a complete processing recipe.
Many photographers continue to value colour negative film alongside digital photography for its colour rendering and physical original.
For disposal information, consult your local chemical waste guidance and the product safety data sheets.
Frequently asked questions
What does C-41 mean in film photography?
C-41 is Kodak's process designation for a standard colour negative developing system. It uses chromogenic development: colour developer reacts with dye couplers in the film to form the image dyes. It is used for compatible film in formats including 35mm and 120.
Which films can be developed in C-41?
Use C-41 for films explicitly labelled for that process, such as Kodak Gold, Kodak UltraMax and CineStill 400D. Supported formats can include 35mm, 120 and 110. Film colour alone is not enough to identify the process: some cinema films require ECN-2. Traditional black-and-white and E-6 slide film use different processing, while ILFORD XP2 SUPER is a black-and-white film designed for C-41.
How long does C-41 processing take?
The conventional colour-developer stage takes 3 minutes 15 seconds near 38°C, but bleaching, fixing, washing, the final bath and drying add time. Total processing time depends on the chemistry and equipment, and scanning adds another stage. Laboratory turnaround also includes the queue and quality checks.
Why is C-41 temperature so important?
The image-forming reactions are sensitive to temperature, so changes can affect density, contrast and colour balance. Maintain the target and tolerance specified for your chemistry and equipment. An accurate thermometer and controlled water bath or processor help achieve consistent results.
What is the difference between C-41 and E-6?
C-41 processes compatible colour negative film into a negative for scanning or printing. E-6 processes slide film into a positive transparency. The chemistry and sequences differ, and each process needs its own specified temperatures and times.
Can I develop C-41 film at home?
Yes, with a suitable tank, reel, thermometer, chemistry and temperature-control setup. Load the film in complete darkness and follow the kit instructions for mixing, time, temperature, agitation and capacity. A professional lab offers an established processing workflow if you prefer not to manage these steps yourself.
What happens after C-41 developing?
The film is fully dried, then scanned or printed as requested. Professional scanners such as Noritsu equipment can provide digital files for viewing and editing. Keep the dry original negatives in suitable photographic sleeves in a cool, dry and dark location, and back up the scans separately.
How do I choose a scan resolution for C-41 film?
Start with your intended use: screen viewing, cropping or printing. Analog Film Lab can advise based on your format and desired output. Higher-resolution files offer more pixels and cropping flexibility but are larger, and the detail available still depends on the original negative.
Processing reference: Kodak C-41 processing guidance. Always follow the instructions for your exact chemistry.